Installation of Steeda Underdrive Pulleys on a 1999 Cobra
(Last modified on 6/24/00 by Joe Lynch)
I purchased a used set of 1998-2000 Cobra underdrive pulleys and installed them on my 1999 Cobra. Here are my notes on that installation. Thanks to everyone who reviewed the draft version of these notes on the Corral and BlueOvalNews message boards during the week of June 19, 2000. I have tried to incorporate all the comments in this version.
Installation on the 1996-1998 Cobras and GTs is similar but may not be identical to this install. Follow the instructions that come with your pulleys if there are differences with what I wrote here.
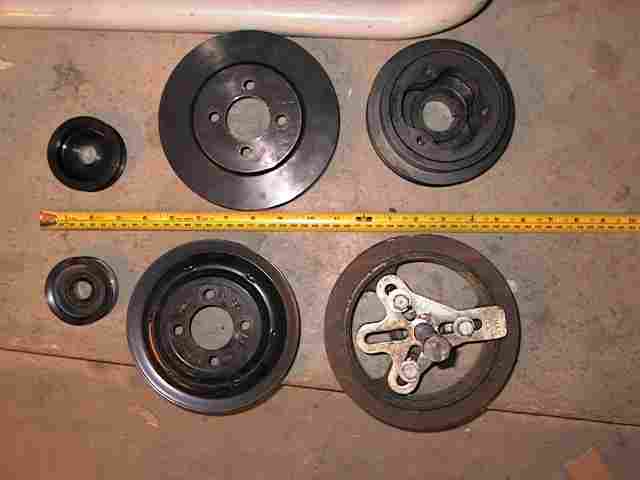
In the following photo, the stock pulleys are on the bottom and Steeda replacement pulleys are on top; from left to right: alternator, water pump, and crank dampener. The crank pulley puller is shown on the stock dampener pulley.
Tools Required
1. Three-arm Harmonic Dampener Puller with three 5/16"x2" bolts,
standard thread, and washers.
2. 3/4" open end wrench for (my) puller, 1/2" socket and ratchet
for puller bolts.
3. 18mm socket and 1/2" breakover bar and ratchet for crank dampener
bolt
4. RTV gasket sealer for keyway on crank dampener.
5. 10mm socket and 3/8" drive ratchet for water pump pulley bolts.
6. 10mm deep socket for reservoir mounting nuts, 3" extension.
7. 13mm and 15mm box wrenches for tensioner bolts/nuts.
8. Large screwdriver or pry bar to use on the tensioner.
9. 15/16" socket for alternator pulley nut.
10. Impact wrench for alternator pulley nut (otherwise you will have
to take alternator off).
11. Rhino ramps or jack and jack stands.
12. Creeper.
13. Droplight, music, beverage (Diet Dr. Pepper!), guard dog, fan,
answering machine.
Summary of Steps
1. Raise car on ramps or jack stands.
2. Put the transmission into 5th
gear and set the parking brake.
3. Loosen and move coolant reservoir.
4. Loosen alternator pulley nut, water pump pulley bolts, and crank
pulley bolt .
5. Remove belt.
6. Remove alternator pulley, water pump pulley, crank pulley.
7. Install new pulleys.
8. Install belt.
9. Tighten retaining bolts.
10. Reinstall coolant reservoir.
11. Lower car.
Detailed Notes
These notes are specifically for the Steeda set. The ASP set should be similar, but I am not sure.
(Note to GT owners with Automatic Transmission -- Several people report that you will have to jack your car up and place it on jackstands to allow access to a torque convertor bolt to use to keep the engine from turning when removing the crankshaft bolt and torqueing the crankshaft bolt down when installing the new pulley. I haven't done the pulley install on an auto car myself so I offer this advice without having tried it myself: Pull the plug (dust cap) on the underside on the transmission and rotate the crank until you see a small bolt. You can hold it with a socket and breakover bar to keep the crank from turning. Of course, you'll need someone to give you a hand.)
1. Raise car on ramps or jack stands, place trans in 5th gear and set the parking brake.
It was easier for me to get to the crank pulley from underneath the car, but this isn't a must. The height from Rhino ramps was perfect for the entire job, I could work on top and on bottom with the car on the ramps.
CAUTION: If you decide to use jack stands, be very careful to set the parking brake, leave the trans in 5th gear, and block the rear wheels. You MUST be careful not to rock the car off the jack stands when removing and later torqueing down the crankshaft bolt! The Rhino Ramps are a better option than using jack stands. You can get to everything without raising the car at all if you do not have Rhino Ramps or if you do not want to use the jack stands.
2. Loosen and move coolant reservoir.
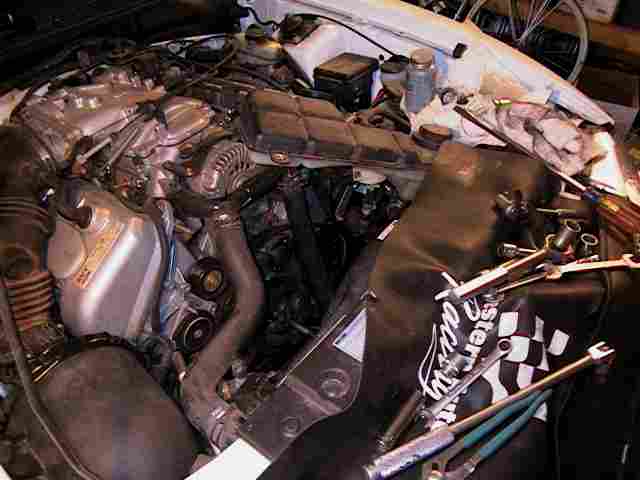 This step is not a necessity, but it helped me get to the alternator
with a large electric impact wrench without removing anything else.
Several people have changed the pulleys without moving the coolant tank.
It was easier for me to move it.
This step is not a necessity, but it helped me get to the alternator
with a large electric impact wrench without removing anything else.
Several people have changed the pulleys without moving the coolant tank.
It was easier for me to move it.
There are three 10mm wrench size nuts holding the reservoir in place. Remove these and raise the reservoir then move the coolant tank over a few inches toward the battery. This will allow better access to the alternator and water pump bolts. You do not have to drain any coolant or loosen or remove anything except the three retaining nuts.
Some people recommended removing the cooling fan assembly as well, especially if they are going to do the entire job from the top of the car with the car on the ground. Disconnect the motor wiring at the connector and remove the retaining screws/nuts and remove the fan as an assembly. I did not choose to do this since I had the car up on the Rhino Ramps.
3. Loosen alternator pulley nut, water pump pulley bolts, crank pulley bolt.
Leave the belt on at this point to help keep the pulleys from turning. Make sure the car is in 5th gear with the parking brake on.
The alternator nut is 15/16" and will require an impact wrench to remove. If you have an impact wrench, you can easily remove the nut if the belt is still in place without disconnecting the alternator or otherwise disturbing it..
If you do not have an impact wrench, it will be necessary to disconnect the battery, then remove the alternator from the car and take it to a shop that has an impact wrench and a 15/16" socket. Be sure and take your new alternator pulley with you so you can install it after you remove the old one. This will save you a trip to the shop.
You may still have to use a large screwdriver to wedge between a bolt head and the pump boss on the water pump pulley to hold the pump pulley while loosening all the bolts.
4. Remove belt.
Easier said than done. I had planned on using my bolt in the end of the idler pulley, but this time the bolt didn't feel right, so I installed one of the tensioner studs here and used a large screwdriver as a lever to move the tensioner enough to slide the belt off the alternator pulley. More later. The 1999 Fix belt tensioner is a troublesome design as far as removing the belt goes. (The tensioner mechanism itself is apparently very good, however.)
5. Remove alternator pulley, water pump pulley, crank pulley.
The alternator and water pump pulleys should come off as soon as the
retaining hardware is removed. The crank pulley is a little more
difficult.
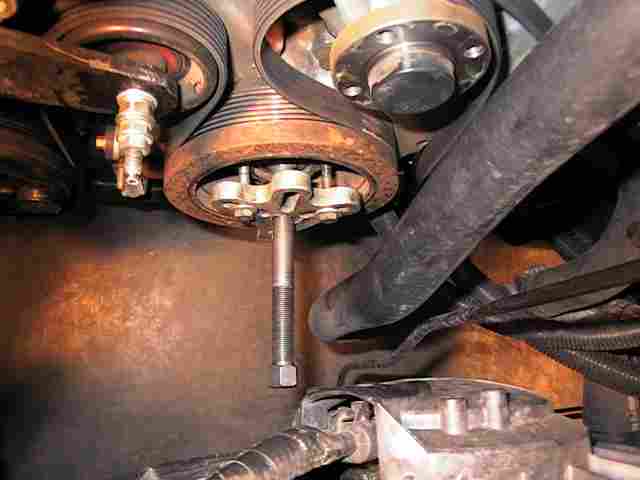
Remove the crank bolt with an 18mm socket and large breakover or impact wrench. (Be very careful not to wedge your hand between the end of the impact wrench and the radiator as the bolt backs out if you use an impact wrench!)
After removing the bolt, REMOVE THE LARGE WASHER!! The washer may be stuck to the end of the crank with sealer. If you can't see the end of the crankshaft and the keyway, the washer is still there. Do not install the puller without first removing the washer.
With the washer removed, install the damper puller using the three 2" long 5/16" bolts. Trial fit the bolts into the three pulley bolt holes to make sure the threads are clear and that the bolts you have are the correct size and thread. Oil the threads and be very careful not to screw the bolts in more than about 5 turns or they will come out the back side of the dampener and rub or scratch the timing cover.
Before removing the crank pulley, note the clearance between the timing cover and the back of the pulley so you will now what the pulley position should be when it is installed properly.
My puller tool bolt is too long to allow the use of an impact wrench on the center puller bolt. I was able to remove the pulley using a 3/4" open end wrench from the bottom of the car. It will take a lot of torque to get the pulley to start moving, but it will come off, IF you removed the washer before installing the puller!
After removing the crank pulley, carefully wipe any dirt away from the seal area and check to make sure the keyway key is still in place. Wipe the end of the crankshaft off and carefully clean all the surfaces where the pulley slides onto the crankshaft.
6. Install new pulleys.
Trial fit the new long bolt provided with the pulleys into the threads in the end of the crankshaft. Oil the threads and screw the bolt into the end of the crankshaft and verify that the long bolt threads are correct for your crank. STOP if the long bolt does not go into the crankshaft as easily as the stock bolt!! If you have any difficulty with the long bolt, compare the long bolt to the stock bolt diameter and thread. If there is any doubt, take the stock bolt to an Autozone or other parts store and buy/rent a damper installer tool with the correct thread before proceeding.
Wipe the crank clean, oil the new pulley on the front seal surface, and put a dab of gasket sealer on the keyway and on the backside of the washer. Start the new pulley onto the crank by hand, carefully aligning the pulley keyway with the key. Install the washer, then the long Steeda bolt and use it to pull the new crank pulley PARTWAY to the crankshaft, say to within a 1/4" of its final position. Then remove that long bolt, leave the washer in place, and install the stock bolt and continue tightening it down until the pulley quits moving.
The crank bolt tightening instructions from the Ford 1999 Cobra shop manual are the following:
Tighten the bolt down to 66 ft-lbs torque.
Loosen 1 full turn.
Retighten to 37 ft-lbs.
Tighten an additional 90 degrees (1/4 turn)
Note that the Steeda instructions called only for tightening the bolt to 85 ft-lbs. I tightened mine a little more than this. I recommend following the Ford instructions as stated above if you have a torque wrench, otherwise tighten it down to an estimated 100-120 ft-lbs and borrow a torque wrench to check it at a later time.
I did this from the bottom of the car with an 18mm deep socket.
From the top of the car, place the new water pump pulley in place and start the bolts, then hand tighten them.
Place the new alternator pulley in place and hand tighten the nut. Check to make sure the alternator turns freely with the pulley in place and the nut snug. If the alternator does not turn freely, STOP and find out why before proceeding.
(Reinstall the alternator if you had to remove it to take it to a shop to get the alternator pulley swapped. Reconnect the battery after reinstalling the alternator.)
7. Install belt.
Check the belt routing very carefully and get the belt in the proper position for all the pulleys except for the alternator. Then use the large screwdriver or other lever to move the tensioner down with one hand and slide the belt over the alternator tensioner with the other hand. Release the tensioner and check the belt on every pulley.
8. Tighten retaining bolts.
Use the impact with 15/16" socket on the alternator pulley nut. Use a 10mm wrench on the water pump bolts. The crank bolt should already be tight.
9. Re-install the cooling fan (if it was removed) and wiring connector and re-install the coolant reservoir (if it was moved), using a 10 mm deep socket on the retaining nuts. Do not overtighten this hardware.
10. Lower car, start engine, check for anything abnormal. Wipe engine compartment down, clean up tools, check phone messages, feed the dog, go drive.
I have not had any problems at all with my used pulley set and I am very happy with them, as are 100s of other Steeda customers. I offer the following for information only, to prevent an incorrect and potentially expensive diagnosis by shop technicians........
There have been some isolated reports (my guess is five) of a clicking noise developing after the pulley install. If this occurs on your car, there is a chance that the crank pulley has a defective molding between the inner and outer pulley pieces. This problem has been reported on the Mustang bulletin boards on only a few installations (not mine!). Call Steeda and report your noise. Steeda may want you to remove and return your pulley set for a refund or replacement. It is difficult to identify the exact location of the clicking noise and I would recommend putting the stock pulleys back on the car if a noise develops to see if the noise disappears. Do this before taking the car in to a dealership for diagnosis. The dealer may suspect timing chain or timing chain tensioner damage rather than the Steeda pulley and thus make a faulty and potentially expensive diagnosis.
Note that installing any aftermarket parts on your car has the potential for creating problems if the installation does not go as planned. Make changes at your own risk.
*CCL 5/4/04*