Removing and Replacing the Half-shafts and IRS Differential
Pumpkin
It is not very difficult to remove the Pumpkin from a 99 Cobra.
The procedure is just more like that used for a front wheel drive car with
half shafts and constant velocity joints (CVJs) than anything else.
The ring and pinion gear setup is exactly the same as for a standard live
axle 8.8" Ford rear end.
Removing the Half-shafts
 Some of the steps in the the shop manual procedure can be bypassed, but
not the torque settings or other specifications. I used jack stands
and a creeper in my garage rather than a lift. The only special tools
you will need are a 36mm socket for the axle nuts and a wheel puller (Autozone
27037 shown on the right).
Some of the steps in the the shop manual procedure can be bypassed, but
not the torque settings or other specifications. I used jack stands
and a creeper in my garage rather than a lift. The only special tools
you will need are a 36mm socket for the axle nuts and a wheel puller (Autozone
27037 shown on the right).
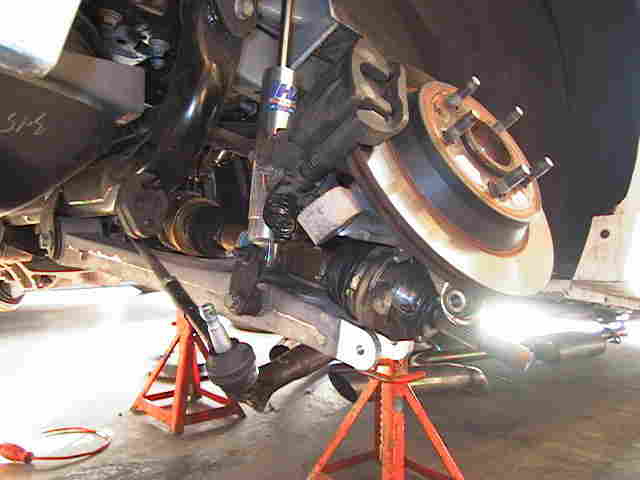
1. Support the car on jack stands ahead of the IRS at
the chassis
2. Remove the rear wheels
3. With the parking brake on and the car in gear, use a 36 mm
socket and a breakover to loosen the large axle nuts. Remove the
nuts.
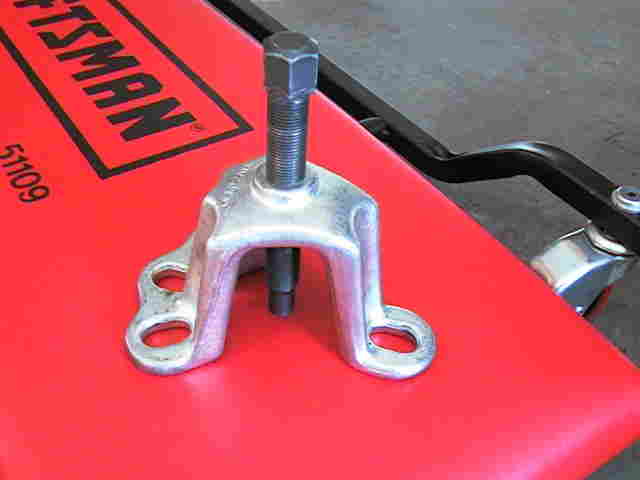
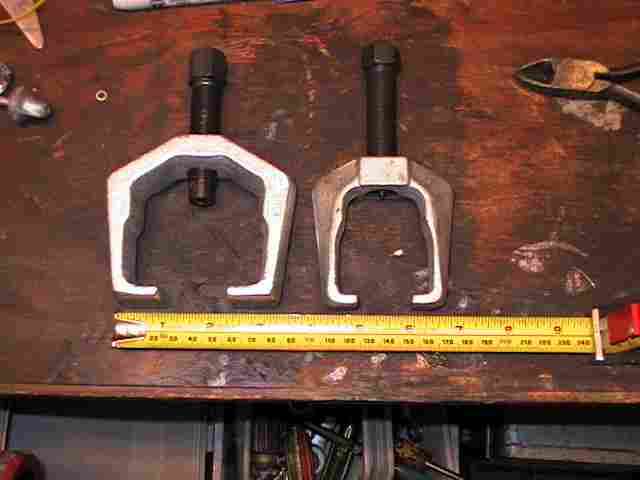 4. Remove the toe-in tie-rod at the knuckle. You may have
to use a puller once the cotter pin and the nut are removed. The
aluminum end of the knuckle is large so make sure the puller you get is
large enough to clear the knuckle arm, if you go buy a new puller at Autozone.
I believe the proper puller is part number 25202 and is about 3.5" wide
overall. One that is too small is also shown at left for comparison.
4. Remove the toe-in tie-rod at the knuckle. You may have
to use a puller once the cotter pin and the nut are removed. The
aluminum end of the knuckle is large so make sure the puller you get is
large enough to clear the knuckle arm, if you go buy a new puller at Autozone.
I believe the proper puller is part number 25202 and is about 3.5" wide
overall. One that is too small is also shown at left for comparison.
3. Take the parking brake clamp loose at the spring lower mount
on the lower control arm.
4. Remove the nut on the lower knuckle bolt, but leave the bolt
in place for now to hold the knuckle steady while you push the axle out
of the hub. Leave the brake calipers and parking brake cable installed.
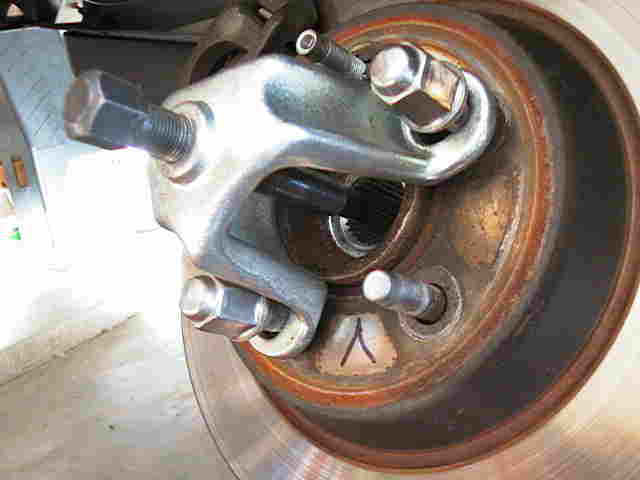 5. Install
the puller (Autozone #27037) on the wheel studs and push
the axle stub end out of the hub. You can get the axle started out
of the hub with the puller; then, remove the lower knuckle bolt and pull
the knuckle out and up to get enough clearance to get the axle completely
out of the hub. Leaving the lower bolt in as long as possible
helps to support the heavy knuckle/brake assembly while you are wrestling
with the wheel puller. When the splines are clear, raise the knuckle
assembly up as high as possible and push the axle completely out of the
hub. There is just enough clearance to get the half shaft stub axle
out of the hub from the inboard side. Lay the half shaft down on
the lower arm and lower the knuckle. Put a jack stand or some other
support under the knuckle assembly if you can to keep it off the half-shaft.
5. Install
the puller (Autozone #27037) on the wheel studs and push
the axle stub end out of the hub. You can get the axle started out
of the hub with the puller; then, remove the lower knuckle bolt and pull
the knuckle out and up to get enough clearance to get the axle completely
out of the hub. Leaving the lower bolt in as long as possible
helps to support the heavy knuckle/brake assembly while you are wrestling
with the wheel puller. When the splines are clear, raise the knuckle
assembly up as high as possible and push the axle completely out of the
hub. There is just enough clearance to get the half shaft stub axle
out of the hub from the inboard side. Lay the half shaft down on
the lower arm and lower the knuckle. Put a jack stand or some other
support under the knuckle assembly if you can to keep it off the half-shaft.
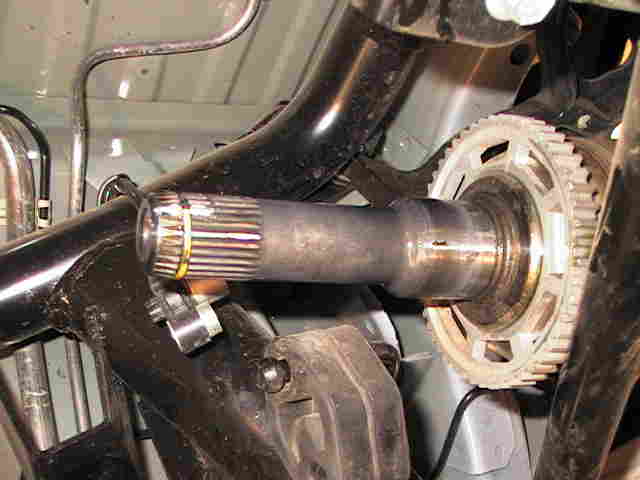
Now, you should be looking at something like this:
6. Repeat on other side.
(Skip to step 9 if you are just changing the half shaft.
There is no
need to remove the exhaust or the ABS sensors unless you are pulling the
pumpkin.)
7. Remove the cat-back exhaust system now to allow access to the
pumpkin and half-shafts during removal.
8. Remove the ABS sensors with a 1/2" open end wrench or the proper
Torx head socket.
9. You can now gently pull the half shaft inboard stub shaft from
the pumpkin. It is nice, but not necessary, to have two people when doing
this step: one
to support the inboard stub shaft, and one to support and pull on the other end
of the half shaft.
-
Before removing the half shaft, note the clearance
between the ABS sensor wheel and the pumpkin case for reference when you
put the axles back in.
-
Support the inboard stub shaft and carefully
pull it out of the seal and support bearing in the pumpkin.
All that is retaining the stub shaft in the pumpkin is a Circlip on
the axle that fits in a groove in the spider gears in the differential.
When these are new and not corroded, it takes very little force to overcome
the slight spring force of the Circlip in the spider gear groove.
If needed, you can use a screw driver at the pumpkin but the shaft should
come out very easily without much prying. Leave the half shaft
lying on the lower control arm. You don't need the special tools
in the shop manual to remove the half-shaft.
-
Be careful replacing the half shaft inboard stub shafts in the
pumpkin.
-
Oil the stub shaft where it runs on the seal and and
install them. It helps to have someone support the outboard end of
the half shaft when re-installing the inboard stub shaft.
-
Make sure
the shaft goes into the pumpkin all the way and that the Circlip re-engages
the groove in the spider gear. You will feel it click into place
and the clearance between the ABS sensor and the pumpkin case will be the
same as it was before you removed the half-shaft.
Reverse steps 1-8 to re-install the halfshafts. Clean the hub splines and use anti-seize
before re-installing the half
shafts so they will be easier to remove next time. Use anti-seize
under the axle nut as well. Get the axle nut as tight as you can--spec
is 240 ft-lbs. The book says use a new nut. I didn't, you decide.
I checked the nuts a few weeks later and it was still tight.
Do not tighten the lower knuckle bushing nut until you put a jack under
the lower control arm and raise it back up to the normal ride position.
If you tighten it with the lower control arm at its full extension and
then lower the car, the bushing is restrained at the jacked up position
and gets twisted way too much when the car is lowered and the bushing may
become damaged, according to Ford.
Pumpkin Removal--After Half-shafts Are Out
-
Do not remove the brace under the yoke. It can be left in place.
-
Match mark the drive shaft and yoke and drop the drive shaft.
-
Leave the drive shaft front yoke in the transmission.
-
Remove the
two front pumpkin support bolts using 18 mm socket and box wrench for backup.
-
Rest the front of the pumpkin on the cross brace.
-
Then put a floor
jack under the pumpkin and remove the two 15mm headed rear bolts.
-
Have someone slowly lower
the floor jack while
you tilt the front of the yoke upwards to clear the front brace.
-
Lower the pumpkin to the floor, keeping
it horizontally level so that the lube doesn't run out the axle stub shaft holes.
Reverse to re-install. I put the 3 pints of lube back in before putting
on the rear cover. I also used
antiseize on the outboard stub shaft splines and the axle nut to make
it easier to disassemble next
time. I also used antiseize on the drive shaft bolts and mount
bolts. Do not use antiseize on the ABS sensors, since they
had loctite on them from the factory.
There is no gasket on the pumpkin cover. Just a groove for RTV
sealant.
I had a professional shop set up the ring and pinion because I don't
have a press for the pinion bearing.
| |
Torque Specs in Ft-lbs |
Wrench Size |
|
Rear axle nut
ABS Sensor
Tie Rod end
Shock Lower
Knuckle Upper
Knuckle Lower
Lug Nuts
Diff Housing Cover
Filler Plug
Pumpkin Front
Pumpkin Rear
Driveshaft |
240
17
35
98
66
85
95
24
25
52
76
83 |
36mm
T40 or 1/2"
18mm
18mm
18mm
18mm
13/16"
13mm
3/8" square
18mm
15mm
12mm
12 point |
Joe Lynch
*CCL 5/4/04*
Back
Home